Hey there, are you tired of looking at your old, worn-out floors? Well, you're in luck because, in this article, we will guide you on how to epoxy your floors and give them a brand-new look. Say goodbye to dull floors and welcome a stylish and durable finish that will last for years.
Find out more: Is Epoxy Flooring Good For Living Room
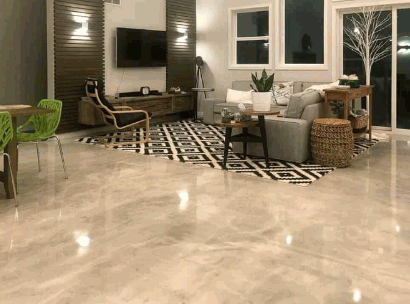
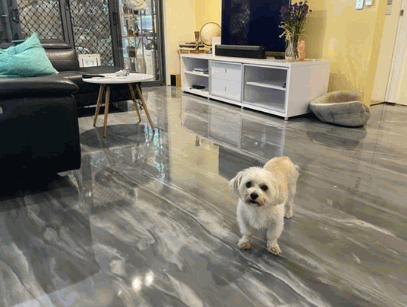
What Is Epoxy Flooring?
Epoxy flooring is a highly durable and versatile option for both residential and commercial spaces. This type of flooring is made from a mixture of resin and hardener, which creates a strong and glossy surface when applied to concrete floors. There are many benefits to choosing epoxy flooring, including its resistance to stains, chemicals, and abrasion. It is also incredibly easy to clean and maintain. Whether you are looking to enhance the aesthetics of your home or create a long-lasting workspace, epoxy flooring is an excellent choice.
One important tip to remember is to thoroughly clean and prepare the concrete surface before applying the epoxy for the best adhesion and longevity.
What Are The Benefits Of Epoxy Flooring?
Epoxy flooring has become increasingly popular in homes for its practical and aesthetic benefits. In this section, we will discuss the various advantages of using epoxy for your floors. From its durability to ease of maintenance, and even its resistance to chemicals, epoxy flooring offers many benefits that make it a top choice for homeowners. Let's take a closer look at each of these benefits and how they can enhance your home.
1. Durability
Durability is one of the main advantages of choosing epoxy flooring for both residential and commercial spaces. To ensure the longevity of your epoxy floor, follow these steps:
- Thoroughly clean and degrease the floor before starting the process.
- Repair any cracks or imperfections present on the floor.
- Create a rough surface for better adhesion by etching the floor.
- Follow the manufacturer's instructions to mix the epoxy resin and hardener.
- Seal the floor and improve adhesion by applying a primer coat.
- Apply the epoxy coating using a paint roller or trowel.
- Allow the epoxy to fully cure before exposing it to heavy traffic.
2. Easy Maintenance
Epoxy flooring is highly regarded for its easy maintenance, making it a top choice for homeowners and businesses alike. To keep your epoxy floor in tip-top shape, follow these simple steps:
- Regular Cleaning: Make sure to regularly sweep or dust mop the floor to remove any dirt or debris.
- Avoid Harsh Chemicals: Stick to mild cleaners or specially formulated epoxy floor cleaners to avoid any potential damage to the floor.
- Reapply Top Coat: Every few years, it's recommended to apply a fresh top coat to protect the epoxy and enhance its appearance.
3. Chemical Resistance
Chemical resistance is one of the key benefits of epoxy flooring. It protects the floor from damage caused by chemicals, oils, and spills. Here are the steps to ensure maximum chemical resistance in your epoxy floor:
- Prepare the floor by thoroughly cleaning and degreasing it.
- Repair any cracks or imperfections in the floor.
- Etch the floor using an etching solution to create a rough surface for better adhesion.
- Mix the epoxy resin and hardener according to the manufacturer's instructions.
- Apply a primer coat to the floor to enhance adhesion.
- Apply the epoxy coating, making sure to cover the entire surface evenly.
- Allow the epoxy to cure completely before using the floor.
By following these steps, you can ensure that your epoxy floor has excellent chemical resistance and will withstand various substances without any damage.
What Are The Different Types Of Epoxy Flooring?
When it comes to flooring options, epoxy is a popular choice for its durability and versatility. However, within the category of epoxy flooring, different types serve various purposes. In this section, we will discuss the three main types of epoxy flooring: self-leveling, mortar, and graveled. By understanding the differences between these options, you can determine which type of epoxy flooring is best suited to your needs and preferences.
1. Self-Leveling Epoxy
Self-leveling epoxy is a type of epoxy flooring that provides a smooth and level surface, commonly used in commercial and industrial settings due to its various advantages. To apply self-leveling epoxy, follow these steps:
- Prepare the floor by thoroughly cleaning and removing any dirt, dust, or debris.
- Fix any cracks or imperfections in the floor using an appropriate filler or patching compound.
- Mix the self-leveling epoxy resin and hardener according to the manufacturer's instructions.
- Pour the mixed epoxy onto the floor, starting from the farthest corner and working towards the exit.
- Use a spiked roller to evenly spread the epoxy and eliminate any air bubbles.
- Allow the epoxy to self-level and cure for the recommended time.
- For added protection and durability, apply a top coat.
By following these steps, you can achieve a seamless and professional-looking self-leveling epoxy floor.
2. Mortar Epoxy
Mortar epoxy is a strong and durable type of epoxy flooring. Follow these steps to properly apply mortar epoxy:
- Begin by thoroughly cleaning the floor and removing any previous coatings or contaminants.
- Repair any cracks or imperfections in the floor using an appropriate filler.
- Apply a primer coat to ensure the epoxy adheres properly.
- Mix the mortar epoxy resin and hardener according to the manufacturer's instructions.
- Using a trowel, apply the mortar epoxy mixture to the floor, making sure to achieve an even and smooth coverage.
- Allow the epoxy to cure for the recommended time, typically 24 to 48 hours.
- Once fully cured, the mortar epoxy floor is ready for use.
Pro-tip: For a seamless and professional finish, consider enlisting the help of a professional epoxy flooring installer for mortar epoxy applications.
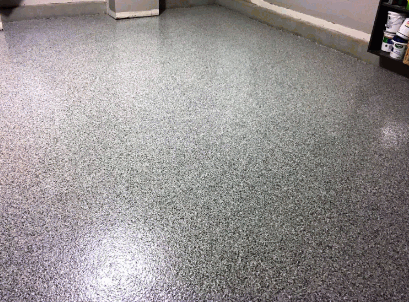
3. Gravelled Epoxy
Graveled epoxy flooring is a type of epoxy flooring that incorporates small decorative stones or aggregates into the epoxy resin. This creates a textured, durable, and visually appealing surface. To install graveled epoxy flooring, follow these steps:
- Prepare the floor by cleaning and repairing any imperfections.
- Apply a primer coat to ensure proper adhesion.
- Mix the epoxy resin and hardener according to the manufacturer's instructions.
- Pour the mixed epoxy onto the floor and spread it evenly with a trowel.
- While the epoxy is still wet, sprinkle the gravel or aggregates evenly over the surface.
- Allow the epoxy to cure completely, typically for 24-48 hours.
- After curing, sweep or vacuum away any loose gravel.
- Apply a top coat of clear epoxy to seal the gravel and provide additional protection.
Graveled epoxy flooring originated as a practical solution for industrial and commercial spaces that needed a durable and visually appealing floor. Over time, it has gained popularity in residential settings as well, where homeowners appreciate its unique texture and customization options. Today, this type of flooring is a versatile option that can be found in various settings, from garages and basements to restaurants and retail spaces.
What Materials And Tools Do You Need For Epoxy Flooring?
Before you begin the process of epoxy flooring in your house, it is important to gather all the necessary materials and tools. Each step of the process requires specific materials and tools, so it is important to have everything prepared beforehand. In this section, we will discuss the essential materials and tools needed for a successful epoxy flooring project. From epoxy resin and hardener to a floor grinder and trowel, we will cover all the necessary items to ensure a smooth and durable finish.
1. Epoxy Resin And Hardener
Epoxy resin and hardener are the essential materials needed for epoxy flooring. Here are the steps for using them:
- Mix the epoxy resin and hardener according to the manufacturer's instructions to ensure proper curing and durability.
- Apply a primer coat on the prepared floor surface to help the epoxy adhere better and provide a smooth base.
- Once the primer is dry, use a paint roller or brush to apply the epoxy coating in small sections for even coverage.
- Allow the epoxy to cure for 24-48 hours as per the manufacturer's instructions.
To maintain your epoxy floor:
- Regularly clean the floor using a gentle cleaner and mop.
- Avoid using harsh chemicals that can damage the epoxy surface.
- Consider reapplying a top coat every few years to maintain the shine and protective layer.
Using the right materials and following proper application and maintenance will ensure a long-lasting and beautiful epoxy floor.
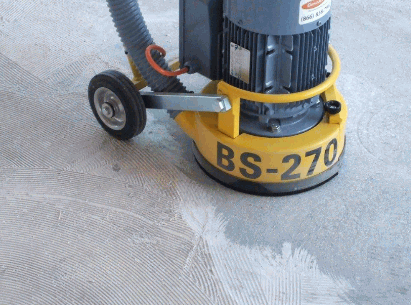
2. Floor Grinder
A floor grinder is an essential tool for preparing the surface before applying epoxy coating. Here are the steps to use a floor grinder effectively:
- Choose the appropriate diamond grinding pad for your specific needs.
- Put on safety gear, including goggles, gloves, and a dust mask.
- Start the floor grinder and move it in a back-and-forth motion to evenly grind the surface.
- Continue grinding until you achieve the desired smoothness and remove any imperfections or coatings.
- Use a vacuum or broom to clean up any dust or debris left behind.
Fact: Using a floor grinder ensures proper adhesion of the epoxy coating, resulting in a long-lasting and durable floor finish.
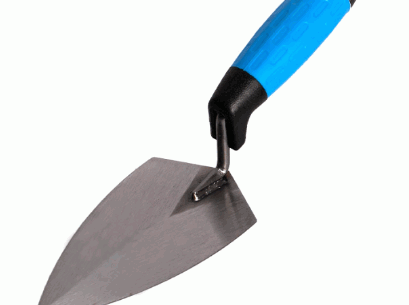
3. Trowel
When it comes to epoxy flooring, using a trowel is an important step in the application process. Here is a list of steps involved in using a trowel for epoxy flooring:
- Prepare the epoxy mixture according to the manufacturer's instructions.
- Pour the epoxy mixture onto the floor in small sections.
- Use a trowel to evenly spread the epoxy over the surface, ensuring that any cracks or imperfections are filled.
- Work in small, overlapping strokes to achieve a seamless and uniform coat.
- Continue using the trowel to spread the epoxy until the entire floor is covered.
- Allow the epoxy to cure as per the manufacturer's instructions before applying any additional coats or finishing touches.
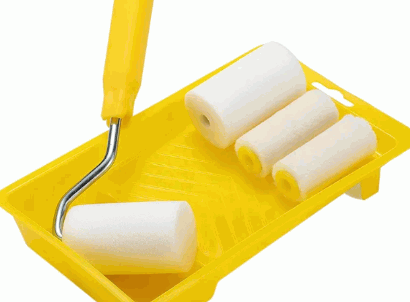
4. Paint Roller
A paint roller is an essential tool for applying epoxy coating on your floor. Here are the steps to use a paint roller for epoxy flooring:
- Choose a high-quality paint roller with a medium or long nap.
- Attach the paint roller to a roller frame.
- Pour the mixed epoxy mixture into a paint tray.
- Dip the paint roller into the epoxy mixture, making sure to coat the roller.
- Start at one corner of the floor and roll the epoxy onto the surface in smooth, even strokes.
- Work in small sections, overlapping each stroke slightly.
- Continue applying the epoxy until the entire floor is coated.
- Allow the epoxy to cure according to the manufacturer's instructions.
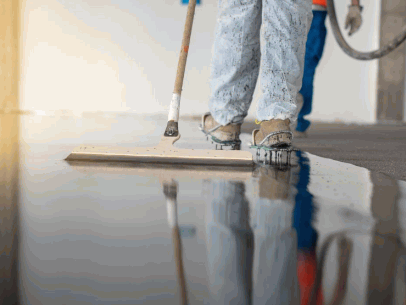
How To Prepare Your Floor For Epoxy Coating?
Before applying an epoxy coating to your floor, it is crucial to properly prepare the surface to ensure a successful and long-lasting finish. In this section, we will discuss the necessary steps to prepare your floor for epoxy coating. We will start by addressing the importance of cleaning and degreasing the floor to ensure proper adhesion. Next, we will go over how to repair any cracks or imperfections in the floor. Lastly, we will discuss the process of etching the floor to create a rough surface for the epoxy to adhere to.
1. Clean And Degrease The Floor
Cleaning and degreasing the floor is a crucial step in preparing it for epoxy coating. To ensure the best results, follow these steps:
- Clear the area: Remove any obstacles, furniture, or debris from the floor.
- Sweep or vacuum: Use a broom or vacuum cleaner to eliminate loose dirt and dust from the surface.
- Remove grease and oil stains: Apply a degreaser and scrub the affected areas with a brush to eliminate any grease or oil stains.
- Wash the floor: Use a mop or a pressure washer to clean the entire floor with a mild detergent or cleaner. Rinse thoroughly to remove any soap residue.
- Dry the floor: Allow the floor to air dry completely or use a fan or dehumidifier to speed up the drying process.
- Inspect for remaining stains: Check the floor for any remaining stains or marks. If necessary, repeat the cleaning process on stubborn stains.
By following these steps, you can ensure that your floor is properly cleaned and degreased, ready for the application of epoxy coating.
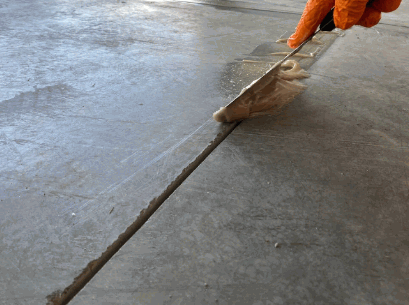
2. Repair Any Cracks Or Imperfections
When preparing your floor for epoxy coating, it's important to address any cracks or imperfections beforehand. Here are the steps to repair them:
- Clean the area around the cracks or imperfections, removing any dirt or debris.
- Use a concrete patching compound or epoxy filler to fill in any cracks or imperfections, following the manufacturer's instructions.
- Smooth out the filled areas using a trowel or putty knife, ensuring they are level with the surrounding floor.
- Allow the patching compound or epoxy filler to dry completely before proceeding with the epoxy coating application.
Pro-tip: For larger cracks or deep imperfections, it may be necessary to use multiple layers of patching compound or epoxy filler, allowing each layer to dry before applying the next.
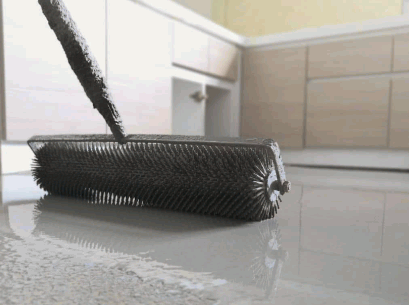
3. Etch The Floor
Etching the floor is a crucial step in preparing it for an epoxy coating.
- Begin by thoroughly cleaning and removing any dirt or debris from the floor surface.
- Mix the etching solution, typically consisting of water and an acid-based product, according to the instructions.
- Apply the solution to the floor using a mop or brush, making sure to cover the entire surface evenly.
- Allow the solution to sit on the floor for the recommended time, usually 10-15 minutes.
- Using a stiff-bristle brush, scrub the floor to help the solution penetrate and eliminate any contaminants or sealants.
- Rinse the floor thoroughly with clean water to neutralize the acid and remove any residue.
- Remove any excess water from the floor using a wet vacuum or mop.
- Wait for the floor to dry completely before proceeding with the application of the epoxy coating.
Etching the floor creates a rough surface that improves the adhesion of the epoxy, ensuring a strong and long-lasting finish.
How To Apply Epoxy Coating On Your Floor?
Are you looking to give your floors a sleek and durable finish? Epoxy coating may be the solution for you. In this section, we will guide you through the step-by-step process of applying epoxy coating on your floor. From mixing the epoxy resin to allowing it to cure, we’ll cover all the essential techniques and tips to help you achieve a professional and long-lasting finish. Let’s dive in and learn how to epoxy floors in your house.
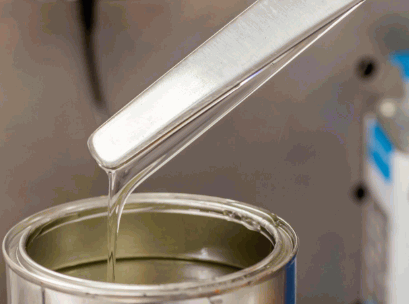
1. Mix The Epoxy Resin And Hardener
Mixing the epoxy resin and hardener is a crucial step in the process of applying epoxy coating on your floor. Here is a step-by-step guide to help you through this process:
- Gather the epoxy resin and hardener in the recommended ratios mentioned on the packaging.
- Pour the epoxy resin into a clean, empty mixing container.
- Add the hardener to the resin according to the specified ratio.
- Use a mixing paddle or stirring stick to thoroughly mix the two components together.
- Continue stirring until the mixture is completely blended and no streaks or swirls remain.
Remember to follow the manufacturer's instructions and safety precautions while mixing the epoxy resin and hardener. Always wear protective gloves and ensure proper ventilation in the area. Once the epoxy is mixed, proceed with the application process.
For best results, it is recommended to mix the epoxy resin and hardener in small batches to avoid wastage and ensure proper curing.
2. Apply A Primer Coat
To properly apply a primer coat to epoxy flooring, follow these steps:
- Prepare the floor by cleaning and removing any dirt or debris.
- Repair any cracks or imperfections in the floor surface.
- Etch the floor using an etching solution to create a rough surface for better adhesion.
- Mix the epoxy resin and hardener according to the manufacturer's instructions.
- Next, carefully apply the primer coat evenly using a roller or brush.
- Allow the primer coat to dry completely before proceeding to the next step.
3. Apply The Epoxy Coating
Applying the epoxy coating to your floor involves several important steps:
- Prepare the surface by cleaning and degreasing it thoroughly.
- Repair any cracks or imperfections in the floor.
- Etch the floor to create a rough surface for better adhesion and prepare for step 3, applying the epoxy coating.
- Mix the epoxy resin and hardener according to the manufacturer's instructions.
- Apply a primer coat to the floor to enhance adhesion.
- Apply the epoxy coating evenly using a paint roller, following step 3.
- Allow the epoxy to cure for the recommended time.
Following these steps will ensure a successful application of the epoxy coating to your floor.
4. Allow The Epoxy To Cure
After applying the epoxy coating to your floor, it is crucial to allow it to cure properly for optimal results. Here are the steps to follow during the curing process:
- Give it time: Allow the epoxy to cure undisturbed for the recommended duration, usually around 24 to 72 hours.
- Avoid foot traffic: During the curing period, refrain from walking or placing any heavy objects on the newly coated floor.
- Maintain temperature: Keep the room at the recommended temperature range, usually between 60 to 90 degrees Fahrenheit, to facilitate proper curing.
- Minimize humidity: Ensure that the curing environment has low humidity levels to prevent moisture-related issues.
- Observe caution: Once the Epoxy has fully cured, you can resume regular use of the floor, but exercise caution to prevent any damage or scratches.
How To Maintain Your Epoxy Floor?
After investing time and effort into installing an epoxy floor in your home, it’s important to know how to properly maintain it to ensure its longevity and beauty. In this section, we’ll discuss the essential steps for maintaining your epoxy floor, from regular cleaning to avoiding harsh chemicals that can damage its surface. We’ll also touch on the importance of reapplying a top coat every few years to keep your epoxy floor looking as good as new. Follow these tips and your epoxy floor will continue to shine for years to come.
1. Regular Cleaning
To maintain the longevity and appearance of your epoxy floor, regular cleaning is crucial. Follow these steps for effective cleaning:
- Sweep or vacuum the floor to remove loose dirt and debris.
- Mix a mild detergent with warm water in a bucket.
- Dip a mop or soft-bristle brush into the soapy water and gently scrub the floor in a circular motion.
- Rinse the mop or brush frequently in clean water to prevent spreading dirt.
- After cleaning, thoroughly rinse the floor with clean water to remove any soap residue.
- Dry the floor using a clean mop or towel to prevent water spots or streaks.
2. Avoid Harsh Chemicals
When maintaining your epoxy floor, it's important to avoid harsh chemicals to preserve its durability and appearance. Here are some steps to follow:
- Use a pH-neutral floor cleaner to regularly clean the floor and remove any dirt or debris.
- Avoid using bleach or ammonia-based cleaners, as they can damage the epoxy coating.
- If you need to remove tough stains, try using a mild detergent or a specialized epoxy-friendly cleaner.
- Always rinse the floor thoroughly after cleaning to remove any residue.
- Consider using non-abrasive cleaning tools, such as soft bristle brushes or microfiber mops, to avoid scratching the epoxy surface.
By following these guidelines, you can ensure that your epoxy floor stays in great condition for years to come.
3. Reapply Top Coat Every Few Years
To maintain the longevity and appearance of your epoxy floor, it is recommended to follow these steps and reapply a top coat every few years:
- Clean the floor thoroughly, removing any dirt or debris.
- Lightly sand the surface to create a better bond for the new top coat.
- Apply a primer coat to enhance adhesion and ensure an even finish.
- Allow the primer to dry completely before applying the top coat.
- Apply the top coat evenly using a paint roller, taking care to cover the entire floor surface.
- Allow the top coat to dry according to the manufacturer's instructions.
- After the top coat has cured, inspect the floor for any missed spots or imperfections.
- If necessary, apply a second coat to achieve the desired finish.
- Regularly clean and maintain the floor to preserve its appearance and extend its lifespan.
By following these steps and reapplying a top coat every few years, you can ensure that your epoxy floor remains in excellent condition and continues to provide durability and easy maintenance. Remember, proper maintenance is key to preserving the beauty and functionality of your epoxy floor.
