Looking to upgrade your lighting fixtures at home or in your office?
Retrofit LED recessed lighting might be the perfect solution for you. In this article, we explore the benefits of choosing retrofit LED recessed lighting, the tools and materials you will need for installation, and provide you with a step-by-step guide on how to install them.
Whether you are looking to save on energy costs, extend the lifespan of your lighting, or simply enhance the ambiance of your space, retrofit LED recessed lighting is a great option to consider.
Discover more: What Is LED Linear Lighting
What Is Retrofit LED Recessed Lighting?
Retrofit LED Recessed Lighting refers to the process of upgrading traditional lighting fixtures with modern LED downlights, enhancing energy efficiency and illumination quality.
In comparison to conventional lighting solutions, Retrofit LED Recessed Lighting offers numerous benefits. LED downlights are renowned for their exceptional energy efficiency, consuming significantly less power than traditional lighting sources. This not only reduces electricity costs but also contributes to environmental conservation by lowering overall energy consumption.
The illumination quality provided by LED retrofit lighting is superior to older lighting technologies. LED lights produce a brighter, more consistent light output, enhancing visibility and creating a more pleasant ambiance.
Why Choose Retrofit LED Recessed Lighting?
Opting for Retrofit LED Recessed Lighting offers numerous advantages, including enhanced energy efficiency, extended lifespan, and substantial cost savings in the long run.
LED downlights have become a popular choice for both residential and commercial settings due to their impressive energy-saving capabilities. The retrofit option allows for easy installation into existing fixtures, making it a hassle-free upgrade that doesn't require a full overhaul. The longevity of LED technology ensures that these lights last significantly longer than traditional bulbs, reducing maintenance costs and inconvenience. Plus the energy and maintenance savings and the overall cost-effectiveness of Retrofit LED Recessed Lighting make it a smart investment for those looking to create a more sustainable and economical lighting solution.
Energy Efficiency
Energy Efficiency is a key highlight of Retrofit LED Recessed Lighting, with LED downlights offering superior brightness while consuming minimal power.
LED downlights are designed to illuminate spaces efficiently, converting a larger percentage of energy into light rather than heat. Their advanced technology allows for a longer lifespan compared to traditional lighting options, reducing the frequency of replacements. Despite their high brightness levels, these downlights remain cool to the touch, making them safe for various applications.
The directional light output of LED downlights ensures that the emitted light is focused precisely where it is needed, minimizing waste and enhancing overall visibility. This targeted illumination not only enhances the aesthetic appeal of a space but also contributes to a more sustainable and environmentally friendly option for lighting solutions.
Longer Lifespan
The longer lifespan of LED downlights in Retrofit LED Recessed Lighting ensures extended durability and reduced maintenance requirements, thanks to advanced LED modules.
LED downlights are known for their longevity, with many models boasting a lifespan of over 50,000 hours of continuous usage. This prolonged lifespan is attributed to the efficient functioning of LED modules, which are designed to last significantly longer than traditional lighting sources.
Due to this extended durability, LED downlights require minimal maintenance, leading to cost savings for homeowners and businesses alike. The reduced need for frequent replacements not only saves money in the long run but also reduces the environmental impact of disposing of old lighting fixtures.
Cost Savings
The integration of LED downlights in Retrofit LED Recessed Lighting leads to significant cost savings over time, with reputable brands like Philips offering efficient and reliable lighting solutions.
LED downlights have become a popular choice for businesses and homeowners looking to lower their energy costs without compromising on lighting quality. By using LED technology, these downlights consume less energy than traditional lighting options, resulting in reduced electricity bills. This energy efficiency, coupled with the long lifespan of LED bulbs, translates into substantial savings in the long run.
In terms of trusted brands in the lighting industry, Philips stands out for its commitment to quality and innovation. Philips LED downlights not only provide excellent illumination but also ensure durability and consistent performance over time. Investing in Philips products guarantees not only immediate savings on energy bills but also a long-term lighting solution that requires minimal maintenance, further enhancing the overall cost-effectiveness.
Easy Installation
The straightforward installation process of LED downlights in Retrofit LED Recessed Lighting makes it a user-friendly solution, often accompanied by detailed tutorials for hassle-free setup.
Users find the process of setting up these LED downlights quite simple, saving both time and effort. The step-by-step tutorials enhance the ease of installation, guiding individuals through each stage effectively. The user-friendly nature of Retrofit LED Recessed Lighting is further accentuated by the availability of comprehensive resources that offer valuable insights and tips for a smooth setup experience. The combination of easy installation and detailed tutorials makes these LED downlights an attractive choice for those looking to upgrade their lighting system.
What Tools And Materials Do You Need?
To install Retrofit LED Recessed Lighting, you will require essential tools and materials such as LED retrofit kits, screws, drills, brackets, and more for a seamless setup process.
You may need a measuring tape to ensure accurate placement of the lights, a pencil for marking spots on the ceiling, and a stud finder to locate ceiling joists. It's also handy to have a wire cutter/stripper for electrical work, a screwdriver for securing fixtures, and a ladder for reaching high ceilings safely. Do not forget to have the user manual of the LED retrofit kit handy for reference during the installation process.
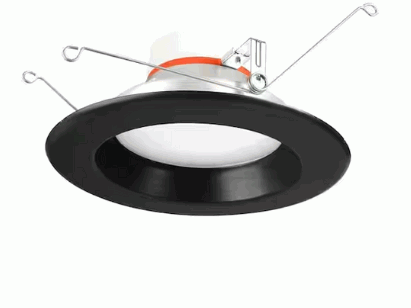
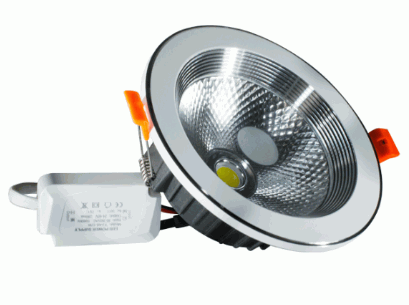
LED Recessed Light Kit
The LED Recessed Light Kit is a core component for Retrofit LED Recessed Lighting installations, comprising LED retrofit kits, LED panel lights, and essential wiring for connectivity.
When embarking on a retrofit LED recessed lighting project, selecting the right LED recessed light kit is crucial. These kits offer a seamless integration of LED retrofit kits, which consist of energy-efficient LED panel lights, ensuring optimal illumination and energy savings. Not only do these kits enhance the visual appeal of the space, but they also contribute to reducing electricity costs and environmental impact.
The inclusion of proper wiring in the LED Recessed Light Kit simplifies the installation process, allowing for efficient connectivity to the existing electrical system. Upgrading to LED panel lights through these kits ensures a brighter, more eco-friendly lighting solution for homes and commercial spaces alike.
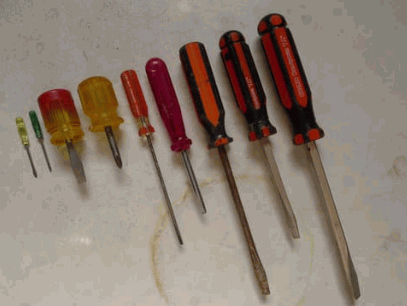
Screwdriver
A screwdriver is a critical tool necessary for securing screws and fastening components during the installation of Retrofit LED Recessed Lighting, ensuring a sturdy and reliable setup.
Without a screwdriver, the process of aligning the screws with precision would be cumbersome and prone to errors.
The ability to choose the right type of screwdriver, whether Phillips, flathead, or Torx, depending on the specific materials used in the installation, is crucial for efficiency.
Its ergonomic design provides a comfortable grip, reducing strain and enhancing control when fastening the screws tightly.
Wire Strippers
Wire strippers are essential tools for electricians and DIY enthusiasts engaging in Retrofit LED Recessed Lighting projects, facilitating the safe and efficient handling of wires during installation.
These versatile tools come in various designs, ranging from manual hand-held strippers to automatic stripping machines, catering to different project requirements. Whether you are dealing with solid or stranded wires, wire strippers offer precision in stripping insulation without damaging the conductor inside.
In Retrofit LED Recessed Lighting setups, where precise connections are crucial for optimal performance, using the right wire stripper ensures that the wires are stripped accurately, promoting seamless electrical conductivity. Electricians rely on these tools to streamline their work processes, reducing the risk of accidents and ensuring the efficient completion of projects.

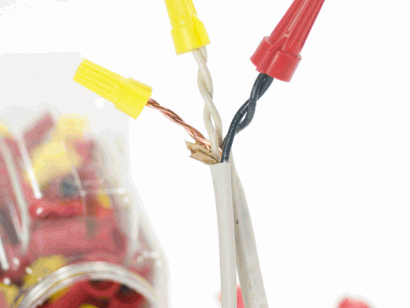
Wire Connectors
Wire connectors play a crucial role in ensuring seamless electrical connections between wires of different colors during Retrofit LED Recessed Lighting installations, promoting safety and efficiency.
These small, yet essential, components are designed to securely join wires of various colors, facilitating proper electrical flow without risking potential hazards due to loose connections. By utilizing wire connectors correctly, DIY enthusiasts and professional electricians alike can create a reliable network that powers LED lights effectively. The compatibility of wire connectors with diverse wire gauges and insulation types makes them versatile solutions for a range of lighting projects. Their straightforward installation process simplifies the intricate task of managing multiple wires in confined spaces, enhancing the overall success of the retrofitting endeavor.
Ladder
A sturdy ladder is essential for installing Retrofit LED Recessed Lighting in ceilings, ensuring proper spacing and accessibility for mounting fixtures securely.
In terms of ceiling installations of Retrofit LED Recessed Lighting, the height and position of the fixtures play a crucial role in ensuring optimal lighting distribution. Using a ladder allows you to reach the ceiling comfortably and position the fixtures at the right distance apart for uniform illumination.
Proper spacing is essential to avoid overlapping light patterns or dark spots in the room. By positioning the fixtures evenly using a ladder, you can achieve a balanced and attractive lighting layout that enhances the overall ambiance of the space.

Step-By-Step Guide For Installing Retrofit LED Recessed Lighting
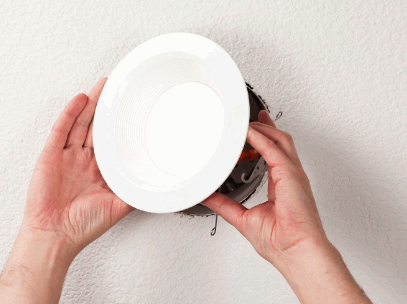
The step-by-step guide for installing Retrofit LED Recessed Lighting involves a systematic process that includes turning off the power, removing old fixtures, connecting wires, attaching LED light trim, testing the light, and ensuring a successful setup.
Before beginning the installation of the LED lights, it is crucial to turn off the power supply to the existing fixture at the breaker box to avoid any safety hazards. Once the power is off, remove the old fixtures carefully following the manufacturer's instructions.
Next, identify the wiring in your ceiling - usually, black wires are hot, white wires are neutral, and bare copper wires are ground.
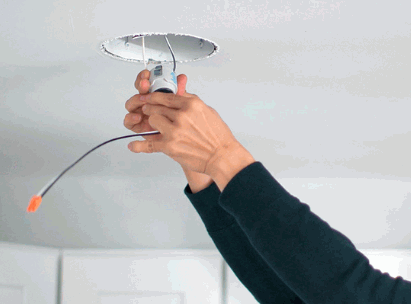
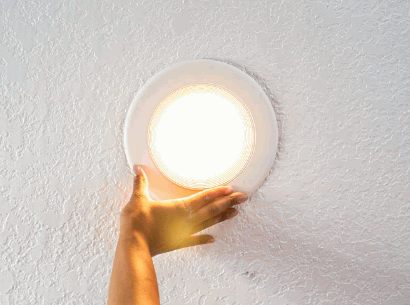
After identifying the wires, connect the corresponding wires from the LED light to the ceiling wires using wire nuts. Ensure a secure connection by gently tugging on the wires. Then, attach the LED light trim carefully to the ceiling, following the specific mounting instructions provided with your fixture, making sure it is flush with the ceiling.
After everything is securely attached, turn the power back on to test the light. If the light functions correctly, you have successfully completed the installation process. Visually inspect the setup to ensure everything looks as it should for a well-installed Retrofit LED Recessed Lighting.
Turn Off Power
Before commencing the installation of Retrofit LED Recessed Lighting, ensure to turn off the power supply to prevent electrical hazards and follow essential safety precautions for a secure working environment.
Turning off the power is a critical step that should not be overlooked to avoid the risk of electric shock and damage to the lighting components. Remember to use a voltage tester to double-check that the power is indeed off before proceeding with any electrical work.
Create a secure workspace by clearing any clutter, ensuring proper ventilation, and using appropriate safety gear such as insulated gloves and goggles to protect yourself during the installation process.
Remove Old Fixture
Removing the old fixture is a fundamental step in retrofitting LED Recessed Lighting installations, requiring the use of appropriate tools and addressing any existing holes to prepare for the new setup.
Before starting the removal process, ensure you have the necessary tools such as a screwdriver, pliers, and a ladder for accessibility. Begin by turning off the power supply to the fixture to avoid any electrical hazards.
Once you have disconnected the power, carefully remove the old fixture by unscrewing it from the ceiling. Be mindful of any existing holes from the previous fixture that may need to be filled or adjusted for the new retrofit installation.
Install Mounting Bracket
Installing the mounting bracket is a crucial step in Retrofit LED Recessed Lighting setups, ensuring proper fixture support, spacing alignment, and secure attachment using screws and brackets.
Mounting brackets play a pivotal role in the overall stability and functionality of the lighting installation. They serve as the backbone, providing the necessary support for the fixture to be securely fastened to the ceiling. The brackets also aid in maintaining the precise alignment and spacing of the recessed lights, ensuring uniformity and aesthetic appeal.
By utilizing screws and brackets, the fixtures are securely attached in place, preventing any risk of falling or shifting over time. The screws firmly hold the brackets, creating a reliable foundation that guarantees the longevity and safety of the lighting setup.
Connect Wires
The connection of wires is a critical aspect of retrofitting LED Recessed Lighting setups, necessitating the use of wire connectors for secure and efficient electrical connections that ensure proper functionality.
When embarking on a Retrofit LED Recessed Lighting project, correctly connecting the wires is crucial to guarantee the smooth operation of the lighting system. Secure electrical connections are essential for safety and performance, reducing the risk of short circuits or electrical hazards. To achieve this, one must carefully strip the insulation from the ends of the wires and then use wire connectors to join them securely. These connectors not only provide a reliable connection but also help maintain the integrity of the electrical circuit.
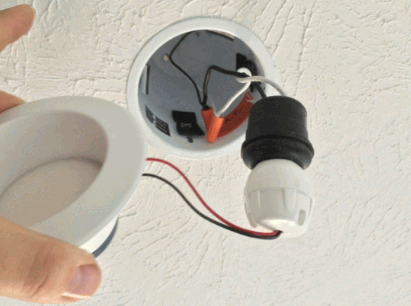
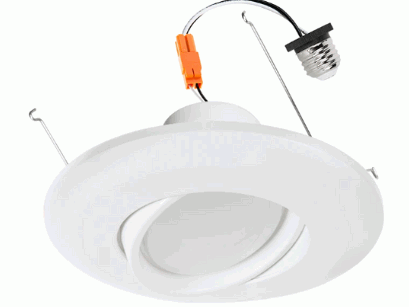
Attach LED Light Trim
Attaching the LED Light Trim, such as the eyeball trim, is a key step in retrofitting LED Recessed Lighting installations, requiring precise spacing considerations and the use of a drill for secure mounting.
Proper spacing of the eyeball trim is crucial to ensure optimal lighting effects and aesthetics. Before attaching the trim, mark the exact locations where the fixtures will be mounted using a pencil or marker.
- Next, carefully drill holes at these marked spots using a drill bit that matches the size of the screws provided with the trim.
Once the holes are drilled, gently place the trim over the recessed lighting fixture and align it with the holes. Secure the trim in place by fastening the screws through the pre-drilled holes, ensuring a snug fit.
Test The Light
Testing the light functionality is essential post-installation of Retrofit LED Recessed Lighting, ensuring proper operation, adjusting color temperature if necessary, and validating features like dimmer compatibility or smart Wi-Fi integration.
Ensuring that the light fixtures are working as intended is crucial to the success of any lighting project. After the installation of Retrofit LED Recessed Lighting, it is important to test the functionality to guarantee that the lights are illuminating correctly and efficiently. Adjusting the color temperature may be necessary to achieve the desired ambiance in the space. It is also advisable to thoroughly check the dimmer compatibility and explore the possibilities offered by smart Wi-Fi integration for enhanced control and convenience.
Additional Tips For Installing Retrofit LED Recessed Lighting
When installing Retrofit LED Recessed Lighting, consider factors like selecting the right color temperature, exploring dimmable options for flexible lighting control, and prioritizing safety precautions throughout the setup process.
Choosing the appropriate color temperature is crucial as it influences the ambiance of the space - warm tones for a cozy feel and cooler tones for a more vibrant atmosphere. Opt for dimmable features to adjust the lighting intensity based on different activities or moods, enhancing the overall functionality of the room.
Spacing considerations are vital to ensure uniform illumination; follow manufacturer recommendations for proper distance between fixtures. Adhere to safety measures such as turning off electricity before installation and handling fixtures with care to prevent accidents.
Choose The Right Color Temperature
Selecting the appropriate color temperature is crucial for achieving the desired ambiance and lighting aesthetics in Retrofit LED Recessed Lighting projects, providing various choices to suit different preferences.
Color temperature plays a significant role in setting the mood and enhancing the overall feel of a space. The warm tones of warm white LEDs create a cozy and inviting atmosphere, perfect for living rooms or bedrooms. On the other hand, cool white LEDs offer a brighter, more energetic ambiance, ideal for kitchens or offices. For a balance between warmth and brightness, daylight LEDs are a popular choice, enhancing productivity while maintaining a comfortable environment.
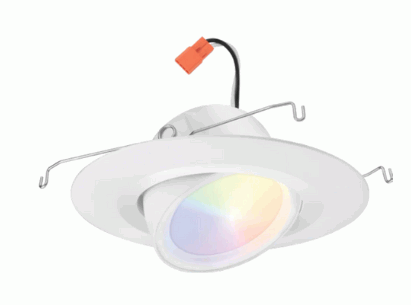
Consider Dimmable Options
Exploring dimmable options, such as incorporating dimmer controls or smart Wi-Fi downlights, adds versatility and lighting control flexibility to Retrofit LED Recessed Lighting installations, enhancing user experience.
Dimmable options not only allow users to adjust the brightness levels of their LED lights according to their preferences but also contribute to energy savings by reducing power consumption when lighting is not at full intensity. By integrating smart Wi-Fi downlights, users can easily control their lighting remotely through smartphone apps or voice commands, adding convenience and modern sophistication to their living spaces. The flexibility offered by dimmable features in Retrofit LED Recessed Lighting projects allows for creating various ambiances and moods, transforming the overall atmosphere of any room.
Follow Safety Precautions
Adhering to safety precautions, such as wearing appropriate gear, securing fixtures firmly, and consulting an electrician for complex wiring tasks, is paramount during Retrofit LED Recessed Lighting installations to prevent accidents.
When embarking on a Retrofit LED Recessed Lighting project, it's crucial to drill holes with precision to accommodate the fixtures securely. This not only ensures proper placement but also reduces the risk of accidents due to loose fittings.
Always remember to switch off the main power supply before commencing any wiring tasks to avoid electrical mishaps. In situations where intricate wiring is involved, the expertise of a professional electrician becomes essential to guarantee safety and compliance with regulations.